


This post contains affiliate links. As an Amazon Associate I earn from qualifying purchases.
Christmas pipe cleaner crafts are one of the fastest ways to fill a house with handmade decorations. A few packs of chenille stems hold whatever shape you bend them into, cost very little, and need no sewing, painting or special tools beyond scissors and a little glue. The same stem that makes a simple ornament for a five-year-old can become a detailed tabletop tree in the hands of an adult hobbyist.
This collection covers ten projects: looped and ombre Christmas trees, a lighted pine built on a paper cup, beaded twists, frosty icicle curls, a mini Santa hat, an icy snowflake, cup characters and plush reindeer. Each one is a free video tutorial credited to its creator, and every project comes with a short list of supplies so you can gather what you need before you start.
To choose, start with who is crafting and how much time you have. Younger kids do best with projects that have no beads or rhinestones, such as the Pipe Cleaner Iridescent Icicle Curls or the Pipe Cleaner Pom Pom Mini Trees with an adult on glue duty. For an afternoon project or a classroom session, ornaments like the Pipe Cleaner Mini Santa Hat Ornament batch well, while the Pipe Cleaner Lighted Pine Tree and the Pipe Cleaner Lace Collar Reindeer reward older kids and adults who want a gift-worthy finish.
Quick List
- Pipe Cleaner Layered Loop Christmas Tree
- Pipe Cleaner Red Gold Beaded Twists
- Pipe Cleaner Pom Pom Mini Trees
- Pipe Cleaner Pink Ombre Ruffle Trees
- Pipe Cleaner Lighted Pine Tree
- Pipe Cleaner Iridescent Icicle Curls
- Pipe Cleaner Christmas Cup Characters
- Pipe Cleaner Mini Santa Hat Ornament
- Pipe Cleaner Icy Blue Snowflake
- Pipe Cleaner Lace Collar Reindeer
Core Techniques Behind Every Christmas Pipe Cleaner Project
Almost every project here comes down to four moves: twisting, coiling, looping and joining. Twisting two stems together locks them into one stronger strand and blends colors, as in red and gold beaded twists. Coiling a stem around a pencil, dowel or skewer gives you even spirals for tree trunks, curls and plush bodies. The diameter of the rod sets the size of the coil, so use the same one throughout a project for matching results.
Loops build most of the trees and snowflakes. Fold a stem back on itself around a finger or rod, pinch the base and twist once to hold it, then repeat along the stem. Keep each loop the same size within a row, and make them slightly smaller as you move up a tree so the shape tapers naturally.
To join stems, overlap the ends by about the width of a finger and twist them tightly together, then press the join flat. For anything that will be handled or hung, add a dot of glue at key joints. Wire tension alone loosens over a season, especially on heavier pieces like lighted trees and cup characters.
Choosing Pipe Cleaners for Holiday Projects
Standard chenille stems are the workhorse for trees, characters and anything that needs a soft, fuzzy surface. They come in deep greens, reds and whites that read as classic Christmas. Buy more green than you expect for tree projects: looped and layered trees use far more stems than their size suggests.
Glitter, tinsel and metallic stems have a thinner pile and a shinier finish. They are ideal for accents such as garland, star toppers and twisted strands, but they show every kink, so bend them deliberately and avoid reshaping the same spot repeatedly. Iridescent stems shift color in the light, which makes them a strong choice for snowflakes, icicles and winter-white displays.
For the plush look of reindeer and cup characters, choose fuller, fluffier stems and wrap them tightly so the pile fills any gaps. Mixing a shiny accent stem into a mostly standard piece is the simplest way to make a homemade decoration look finished rather than plain.
Safety, Age Guidance and Making Decorations Last
Every pipe cleaner has a wire core with sharp ends. Fold each cut end back on itself or tuck it toward the inside of the piece so nothing pokes out. Adults should handle wire cutters and hot glue guns; children can shape, choose colors and place decorations. For crafters under three, skip pipe cleaner projects or keep them strictly supervised, since beads, pom poms, rhinestones and googly eyes are choking hazards.
As a general guide, kids aged four to six can manage simple loops, curls and hats with help. Ages seven to ten can twist, coil and assemble basic trees on their own. Detailed figures, ombre trees and anything with lights or lace suit older kids, teens and adults. Use only battery-powered micro LED lights on pipe cleaner pieces, never bulbs that warm up.
To keep decorations looking good year after year, store them in a box with tissue paper rather than squashed in a bag, and fluff the fibers with your fingers when you unpack. For gifts, set a finished tree or figure in a small clear bag tied with ribbon, or glue a character onto a wrapped box as a topper.
1. Pipe Cleaner Layered Loop Christmas Tree

DIY Handcraft’s tutorial builds a cone-shaped tree from rows of small green loops that overlap like scales, giving it a dense, almost pinecone-like texture. A gold tinsel stem worked in by hand adds a bright accent to the deep green. It’s a tabletop tree with real depth, made entirely from chenille stems.
Keep Every Loop the Same Size
Wrap each loop around the same pencil or dowel so the rows stay even from bottom to top. Uneven loops show right away on a tightly layered cone. Shorten the loops slightly as you work toward the tip so the tree narrows naturally.
Hide Wire Ends Inside the Cone
Each time you finish a row, push the cut end toward the center of the tree rather than leaving it on the surface. That keeps the outside soft to the touch and the silhouette clean. With younger kids, an adult should do the trimming with wire cutters.
🧶 Supplies for the Pipe Cleaner Layered Loop Christmas Tree
Creator Credit: DIY Handcraft
2. Pipe Cleaner Red Gold Beaded Twists

VIKI Studio DIY walks through eight Christmas decorations, led by wavy strands of red and metallic gold stems twisted together and finished with small white pearl beads at the tips. The spiral twist catches light like ribbon candy, and the red, gold and white palette reads instantly as classic Christmas. These work as tree ornaments or as accents tucked into greenery.
Twist Two Colors at an Even Tension
Hold the red and gold stems side by side and twist from one end with steady, even turns. Uneven tension makes one color dominate in patches. Wrap the twisted pair around a pencil afterward if you want a tighter wave.
Secure Beads With a Small Fold
After threading a bead onto the end, bend the last bit of wire back on itself so the bead can’t slide off. The fold also blunts the sharp tip. Supervise young children closely, since pearl beads are a choking hazard.
🧶 Supplies for the Pipe Cleaner Red Gold Beaded Twists
Creator Credit: VIKI Studio DIY
3. Pipe Cleaner Pom Pom Mini Trees

DIY JOY’s tutorial shapes green chenille stems into looped tiers over a cardboard base, then dots the branches with colorful mini pom poms in red, yellow and white. The cardboard core gives each mini tree a sturdy structure, and the pom poms read as bright ornaments without any extra wire work. Making them in two sizes creates a small holiday forest for a shelf or mantel.
Build on a Rigid Cardboard Cone
Roll cardstock or cardboard into a tight cone and glue the seam before adding any stems. Wrap the loops from the bottom up so each row covers the top edge of the one below. A firm base keeps the tree from leaning once the pom poms add weight.
Let Kids Place the Pom Poms
The adult handles the hot glue gun while children choose where each pom pom goes. For younger kids, swap hot glue for tacky craft glue and give it time to set. Spreading colors evenly around the cone keeps the tree balanced from every side.
🧶 Supplies for the Pipe Cleaner Pom Pom Mini Trees
Creator Credit: DIY JOY
4. Pipe Cleaner Pink Ombre Ruffle Trees

DG Handmade’s version swaps classic green for a red-to-pink ombre, with ruffled looped tiers that fade from deep red at the top to pale blush at the base. Small white pearls are scattered across each tier, a gold glitter star sits on top, and a coiled brown trunk lifts each tree off the table. Lined up as a set, they make a soft, modern holiday display.
Plan the Ombre Before You Start
Lay out your stem colors from darkest to lightest and assign each to a tier before wrapping. Use the deepest red at the top, where the tiers are smallest. Keeping the order fixed means a full set of trees will match.
Coil a Sturdy Trunk Base
Wrap brown stems tightly around a pencil, then slide the coil off and flatten it slightly so the tree stands upright. A wider, flatter coil resists tipping. Glue the trunk into the bottom tier rather than relying on wire tension alone.
🧶 Supplies for the Pipe Cleaner Pink Ombre Ruffle Trees
Creator Credit: DG Handmade
5. Pipe Cleaner Lighted Pine Tree

Craft Be 9 builds a full-size tabletop pine on a paper cup base, using 30 green stems for looped branches, brown stems for the trunk, glitter stems for garland and a yellow stem for the star. Mini ornaments and micro LED string lights finish it like a real decorated tree. It’s a more ambitious project with a polished result worth displaying all season.
Weight the Paper Cup Base
Glue the brown-wrapped paper cup upside down to form the stand, then add a little weight inside, such as a small stone, before closing it. A tall tree with lights becomes top-heavy fast. A stable base keeps it upright on a busy table.
Thread Lights Before the Final Shaping
Weave the micro LED string through the branches while they’re still easy to bend, then fluff and adjust the loops around the wire. Keep the battery pack tucked behind or under the tree. Use only battery-powered micro lights, never anything that gets warm.
🧶 Supplies for the Pipe Cleaner Lighted Pine Tree
Creator Credit: Craft Be 9
6. Pipe Cleaner Iridescent Icicle Curls

VIKI Studio DIY’s collection of five decorations features iridescent white glitter stems with the tips curled into small hooks and spirals, giving a frosty, icicle-like effect. The shimmer shifts between silver and pale blue in the light, which suits a winter-white palette. A bundle of these slips into greenery, vases or wreaths for instant sparkle.
Curl Tips Around a Thin Rod
Wrap just the top inch of each stem around a skewer or thin paintbrush handle for tight, matching curls. Vary the direction of the curl from stem to stem so the bundle looks natural. Larger rods give looser, softer spirals.
Display in a Clear Glass Jar
Stand a bundle in a small glass jar or vase with fresh or faux greenery for a quick centerpiece. Clear glass lets the iridescent shimmer show through. For younger kids, this is a good project because there are no small parts to manage.
🧶 Supplies for the Pipe Cleaner Iridescent Icicle Curls
Creator Credit: VIKI Studio DIY
7. Pipe Cleaner Christmas Cup Characters

KESA DIY’s tutorial creates four small cup characters, a reindeer, Santa, snowman and Christmas bear, each with a sturdy pipe cleaner base and tiny faces, hats and scarves. The reindeer has a fluffy brown texture with antlers, the snowman wears a little green tree hat, and the bear carries a candy cane under a Santa hat. They work as gift toppers, ornaments or a tabletop set.
Build the Cup Base First
Coil stems into a flat circle, then build upward in tight rows to form the cup walls before adding any character details. A firm, even base keeps the figure from tilting once you add a head and hat. Glue each new row to the one below as you go.
Use Them as Gift Toppers
A finished cup character can be glued or tied onto a wrapped box or gift bag handle. They also hold a few wrapped candies if left open at the top. For children under three, skip small beads and glued-on eyes and use stitched or drawn features instead.
🧶 Supplies for the Pipe Cleaner Christmas Cup Characters
Creator Credit: KESA DIY
8. Pipe Cleaner Mini Santa Hat Ornament

Crafting with Laura Torres shows a compact Santa hat with a red body, a ruffled white brim and a fluffy white pom pom on top. Hung on a lit tree, it reads clearly from a distance and adds a playful touch among classic ornaments. It’s a quick, small-scale project that suits a batch session.
Make the Brim Extra Fluffy
Use white stems for the brim and shape them into small loops or ruffles so it looks full, like faux fur. Keep the loops close together so no red shows through. Fluff the fibers with your fingers once it’s attached.
Batch Them for a Themed Tree
Once you have the shape down, make several in an assembly line so they match. A cluster of Santa hats on one tree gives a cohesive theme. Older kids can handle the full process; younger ones can add the pom pom with an adult’s help.
🧶 Supplies for the Pipe Cleaner Mini Santa Hat Ornament
Creator Credit: Crafting with Laura Torres
9. Pipe Cleaner Icy Blue Snowflake

FLOOMI by Julia Kole’s snowflake pairs soft white and icy light blue stems, with each arm built from looped, leaf-like sections that look almost like frost crystals. A sparkly rhinestone sits at the center, and the layered texture gives it far more depth than a flat paper snowflake. It works as a tree ornament or a winter accent long after Christmas.
Keep All Six Arms Identical
Make one arm first, then use it as a template for the rest so the loops match in size and count. Lay the arms on a flat surface to check symmetry before joining them. Small differences become obvious once the snowflake is assembled.
Join at the Center With Glue
Twist the arms together at the middle, then cover the joint with a rhinestone or bead glued in place. This hides the bulky wire and locks the arms in position. Keep rhinestones away from young children, who may put them in their mouths.
🧶 Supplies for the Pipe Cleaner Icy Blue Snowflake
Creator Credit: FLOOMI by Julia Kole
10. Pipe Cleaner Lace Collar Reindeer
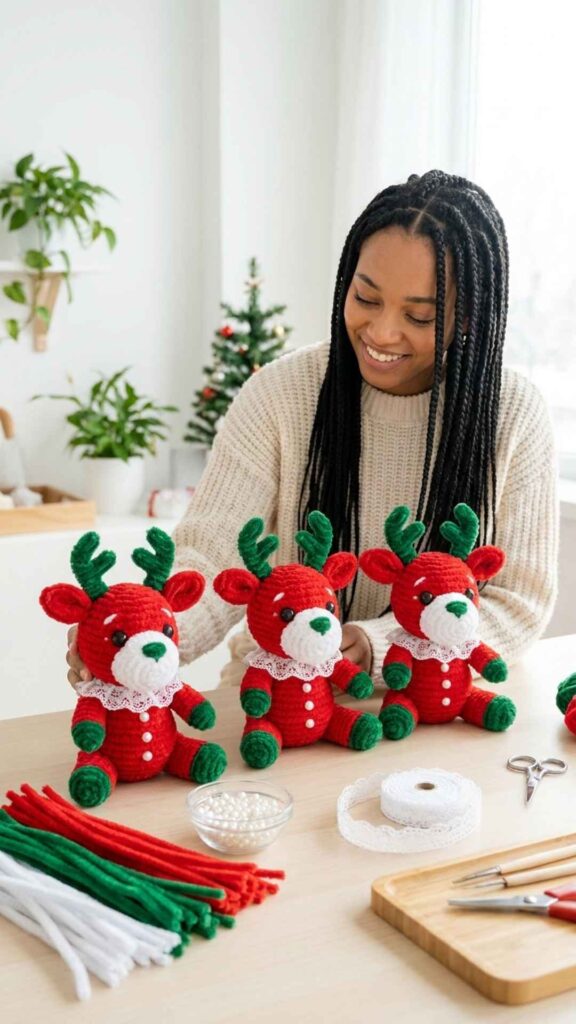
青梅green plum’s full-process tutorial creates plush red reindeer with green antlers, a white face and belly, and a white lace collar, using pipe cleaners, pearl beads and lace. The rounded, chubby shape and big eyes give them a soft toy feel, and the matching snowman in the same video uses the same techniques. A row of them makes a charming mantel display or a handmade gift.
Wrap Tightly for a Plush Body
Coil the red stems closely around the body form so no gaps show, which gives the reindeer its full, rounded shape. Loose wraps make the figure look thin and wiry. Press each round firmly against the previous one as you go.
Attach Lace With a Small Glue Line
Run a thin line of glue around the neck and press the lace in place, overlapping the ends at the back. A light hand with glue keeps the lace from stiffening or soaking through. This is a project best suited to older kids and adults due to the detail work.
🧶 Supplies for the Pipe Cleaner Lace Collar Reindeer
Creator Credit: 青梅green plum
Which Pipe Cleaner Project Should You Make First?
| Style direction | Projects to compare | Main feature | Check before choosing |
|---|---|---|---|
| Kid-friendly tabletop trees | 3, 4 | Looped tiers on a cardboard cone or coiled trunk, decorated with pom poms or pearls | Hot glue needs an adult; pearls on the ombre trees are a small-parts risk for under-threes |
| Showpiece trees for older crafters | 1, 5 | Dense layered loops, tinsel garland and micro LED lights | Longest build time and the most green stems; the lighted pine also needs a paper cup and battery lights |
| Beaded and sparkly ornaments | 2, 9 | Twisted metallic strands and an icy snowflake with a rhinestone center | Beads and rhinestones require close supervision with young children |
| Character figures and gifts | 7, 10 | Santa, snowman, bear and reindeer figures with tiny faces and accessories | Detailed work best suited to ages ten and up; plan extra time for small features |
| Quick starter projects | 6, 8 | Curled glitter accents and a mini Santa hat ornament | Fewest supplies and quickest to finish; still fold sharp wire ends for younger kids |
Conclusion
If you are crafting with young children, begin with the Pipe Cleaner Iridescent Icicle Curls or the Pipe Cleaner Mini Santa Hat Ornament. Both teach basic shaping, finish quickly and need very few supplies. From there, the Pipe Cleaner Pom Pom Mini Trees are the natural next step, adding a sturdy cardboard base and colorful decorating that kids can do themselves.
For older kids and adults who want a piece to display or give, choose the Pipe Cleaner Pink Ombre Ruffle Trees for a modern mantel set, or commit an afternoon to the Pipe Cleaner Lighted Pine Tree. The Pipe Cleaner Christmas Cup Characters and the Pipe Cleaner Lace Collar Reindeer make memorable handmade gifts. Gather your stems, fold every wire end and work through the list one project at a time.
Frequently Asked Questions
What Christmas crafts can you make with pipe cleaners?
You can make Christmas trees, ornaments, snowflakes, Santa hats, reindeer, snowmen and garland accents with pipe cleaners. Green stems become looped or layered trees, while white, red and metallic stems work for ornaments and characters. Adding beads, pom poms or small lights turns simple shapes into finished decorations.
What age is appropriate for pipe cleaner Christmas crafts?
Most children from about age four can make simple pipe cleaner crafts with adult help. Kids aged seven to ten can usually twist, coil and build basic trees on their own, while detailed figures suit older kids and adults. Children under three should not use them unsupervised because of sharp wire ends and small decorations.
How do you make a pipe cleaner Christmas tree stand up?
Build the tree on a rigid base such as a cardboard cone or an upturned paper cup. A coiled pipe cleaner trunk that is flattened slightly at the bottom also helps it stand. For tall or lighted trees, add a small weight inside the base to stop it tipping.
How do you keep pipe cleaner ends from poking?
Fold each cut end back on itself so the wire tip is covered by fuzz. You can also tuck ends toward the inside of a shape or under a glued bead or pom pom. Trim with wire cutters rather than scissors for a cleaner cut that is easier to fold.
What glue works best for pipe cleaner crafts?
Hot glue gives the fastest, strongest hold for joining stems to cardboard, cups and other stems. Clear tacky craft glue is a safer choice for children and works well for pom poms and small features, though it needs time to set. Use a small amount so the fibers do not mat down.
How do you store pipe cleaner Christmas ornaments?
Store pipe cleaner ornaments in a sturdy box layered with tissue paper so they keep their shape. Avoid packing them tightly in bags, which crushes loops and fibers. When you unpack them, reshape any bends and fluff the fibers with your fingers.